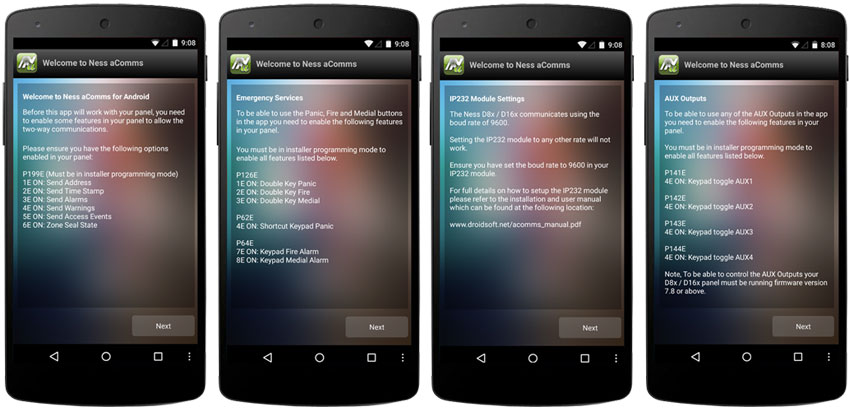
Panel Settings
The two way communications on the D8x / D16x will only work if the following programming locations are enabled on the panel:
P 199 E
1E ON: Send Address.
2E ON: Send Time Stamp
3E ON: Send Alarms.
4E ON: Send Warnings.
5E ON: Send Access Events.
6E ON: Zone Seal State
7E ON: Send Test ASCII String
Panic, Medical & Fire control
If you want to control the Panic, Medical & Fire in the Ness aComms app then you need to make sure you have the following programming locations enabled in the D8x or D16x.
P 126 E 1E ON: (Double key PANIC)
2E ON: (Double key FIRE)
3E ON: (Double key MEDICAL)
P 62 E 4E ON: Shortcut Keypad Panic
P 64 E 7E ON: Keypad Fire Alarm (STD LCD KP)
P 64 E 8E ON: Keypad Medical Alarm (STD LCD KP)
AUX Output Control
To be able to control the AUX Outputs then you need to enable the following settings:
To control AUX1 you need to enable:
P 141 E Option 4 needs to be enabled.
To control AUX2 you need to enable:
P 142 E Option 4 needs to be enabled.
To control AUX3 you need to enable:
P 143 E Option 4 needs to be enabled.
To control AUX4 you need to enable:
P 144 E Option 4 needs to be enabled.
Ness D8x/D16x Deluxe Panels:
To control AUX5 you need to enable:
P 151 E Option 4 needs to be enabled.
To control AUX6 you need to enable:
P 152 E Option 4 needs to be enabled.
To control AUX7 you need to enable:
P 153 E Option 4 needs to be enabled.
To control AUX8 you need to enable:
P 154 E Option 4 needs to be enabled.
System Setup Wiring
The Ness aComms app requires the D8x / D16x to be on a TCP/IP network.
Although the panel doesn’t have a TCP/IP connection you are required to use an Ethernet to serial bridge to add the panel to your network.
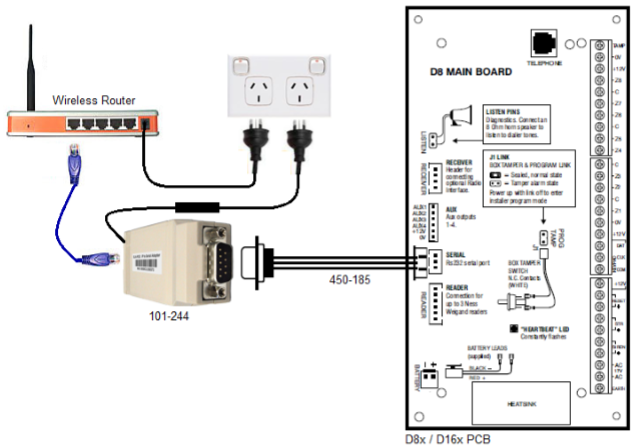
You need to connect the white serial plug into the D8x/D16x and connect the other end into the IP232 Ethernet to serial bridge as shown in the image above, and then you need to connect the IP232 Ethernet to serial bridge into a wireless router/switch.
Black = PIN5
Blue = PIN2
White = PIN3
IP232 Module Setup
Before any connection can be made, you need to make a few changes in the IP232 Ethernet to serial bridge.
To do this you need to open the IP232 Config Utility program which is available from the Ness product page for the IP232 Ethernet to Serial Bridge.
You need to make sure that you have your network cable plugged into the IP232 Ethernet to serial bridge and make sure that it’s connected to the same network your computer is plugged into before continuing.
![]()
You need to click on the Search button, this will go and search for these IP232 Ethernet to serial bridges on your network.
Once it finds an IP232 Ethernet to serial bridge it will display down the bottom how many was found, as well as showing it in the dialog along with its MAC address and IP address.
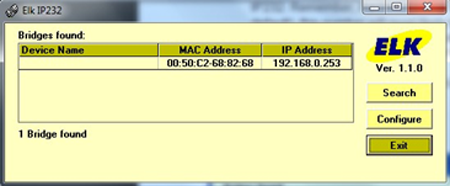
If it fails to find any IP232 Ethernet to serial bridges it will come up with the following error:

Once it finds your IP232 Ethernet to serial bridge, click on it and select Configure.
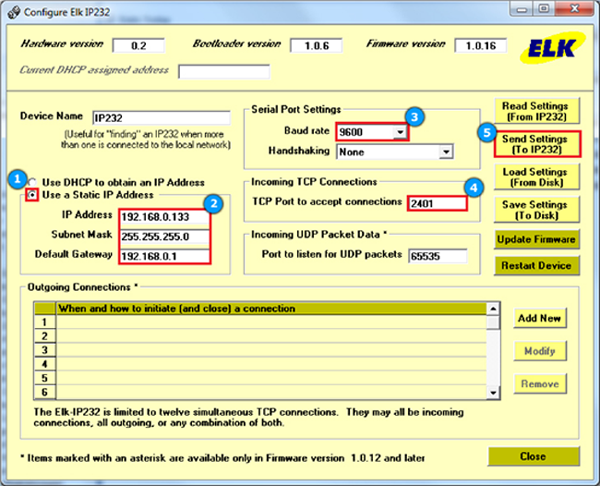
You now need to enter / change some settings in the configure screen.
1. You need to make sure you set the IP address to a static IP address.
2. You need to enter in an IP address for this RS232 Ethernet to serial bridge.
This should be on the same network range as your Android device. (e.g. 192.168.0.xx)
If you are unsure what IP settings to use you might need to contact the network administrator.
3. You need to set the Baud rate to 9600 as that is what the D8x/D16x communicates on.
4. The TCP Port to accept connections should be set to 2401.
This port number can be anything, but recommended to use the default 2401.
5. Once the settings have been entered, click on the ‘Send Settings (to IP232)’ button.
This will apply all the settings to the IP232 Ethernet to serial bridge.
App Setup
When the app is opened for the first time and no panels have been configured before it will remind you what settings need to be enabled in the panel.
Once a panel has been setup in the app, this screen will not appear again.
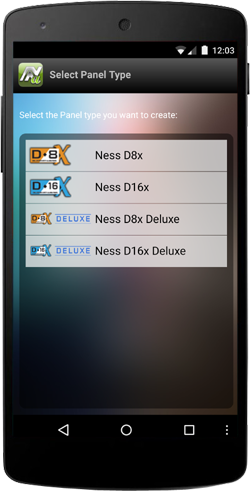
Panel Type
Select your panel type by choosing either the Ness D8x / D16x panel or the Ness D8x / D16x Deluxe panel.
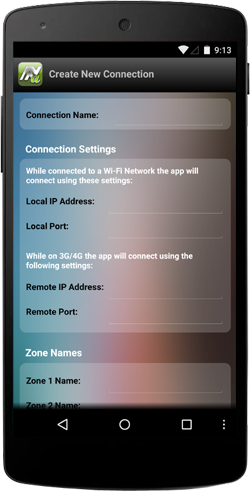
Configuration: IP Addresses
Connection Name
The Connection name can be anything you like. This is used to help identify the panel if you are using multiple panels.
Local IP & Port
This is the IP address and port number the app will use to connect to your panel while you are connected to a Wi-Fi Network.
If you are connected to your home Wi-Fi and then you go to work and use the work Wi-Fi then the app will connect using the local IP address. You may need to use your external or DynDNS hostname instead.
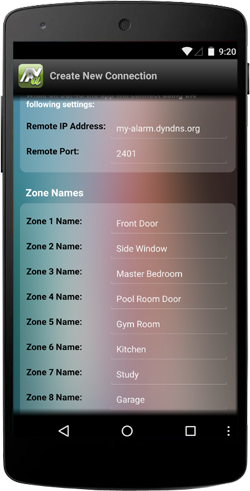
Remote IP & Port
While you are not connected to a Wi-Fi network and connected to a 3G/4G mobile connection, the app will connect using these settings.
This should be set to your external IP and external port that you have port forwarded in your router. (You may need to contact your ISP on how to port forward in your router).
Configuration: Zone & AUX Output Names
Zone Names
Each zone can be given a name. If you are not using a zone then the zone name can be left blank.
If a zone is left blank then the app will not show it in the list of zones and you won’t see the status for the zone that was left blank.
AUX Output Names
Each of the 4 AUX Outputs (or 8 Aux outputs if using a Ness D8x/D16x Deluxe panel) can be given a name and is shown in the app when viewing the AUX outputs screen.
If a AUX output has no name then it will not be shown in the app and you will not be able to control the AUX output.
Configuration: Select Default Panel
Select Panel
Once a the panel has been created you will be asked to select the default panel from the list.
This is the panel the app will automatically connect to when the app opens.
Add Another Panel
If you want to add another panel to the app, simply tap on the App panel at the bottom of the screen.

App Options
The Ness aComms app has some settings that you can set which applies to the whole app.
To access the app options, tap on the 3 dots up the top right of the screen and select App Options from the list.
If this option is enabled and a password is set then you will require to enter in a PIN code every time the app opens.
Background data allows the app to say connected to your panel even when the app is not visible on the screen.
This means that if your panel sends data the app will receive the data and will store it in the app ready for you to see the latest data as soon as the app opens. This will make the loading and viewing information in the app faster when opening the app when this feature is enabled.
This allows you to get system alarms messages in the app when the app is not visible on the screen.
A alarm sound and a notification will popup on the screen when the panel goes into alarm. For this feature to work you need to have Background data enabled.
Even though the app is connected in the background, we are not reliable if your device looses connection to the panel when moving into a bad mobile network coverage.

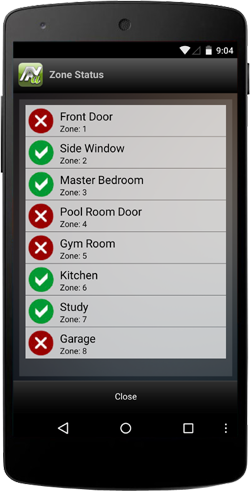
Viewing Zone Status
To view the zone status simply tap on the Zones button at the bottom of the screen.
If you find that no zones are showing in the app then they are not enabled while setting up the app.
Simply open the panel settings page and enter in zone names next to each of the zones you are using on the panel. If no name is entered in the panel settings page then the zones page will not show that zone since you are not using that zone on your panel.
The status icon on the left will automatically change when the status of the zone changes.
Then green status icon means that the zone is sealed.
The red status icon means that the zone is violated.
If the zone status icon is yellow, then that means the zone is in alarm. This will stay yellow into the panel is disarmed.
AUX Outputs
To view the zone status simply tap on the Outputs button at the bottom of the screen.
If you find that no AUX outputs are showing in the app then they are not enabled while setting up the app.
Simply open the panel settings page and enter in AUX output names next to each of the outputs you are using on the panel. If no name is entered in the panel settings page then the AUX output page will not show that output since you are not using that output on your panel.
The Siren and Strobe output is set by default and can’t be changed or renamed and will be listed up the top of the list.
The status icon on the left will automatically change when the status of the AUX output changes.
Then grey status icon means that the AUX output is turned off.
The red status icon means that the AUX output is turned on.
Tapping on the status icon will toggle the AUX output on and off. However the Siren and Strobe outputs can’t be turned on/off from this screen.
You can tap on the name of the AUX output (except Siren and Strobe) and it will display more information of the AUX output.

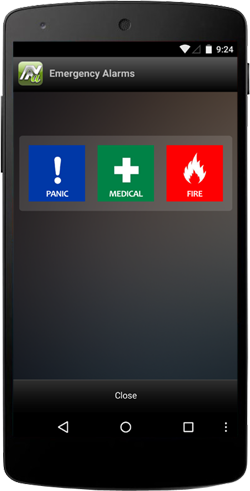
Emergency Alarms
Emergency alarms in the app will allow you to trigger the panic, fire or medical alarms on your panel.
Next you will see 3 buttons that you can trigger and activate.
After tapping on the emergency type it will popup with a message saying are you sure you want to trigger that emergency alarm before it sends the command to the panel.
After confirming the activation of the alarm the panel will then activate the alarm.
If you want to stop the alarm then you will need to enter a valid user code on the panels keypad or enter in a valid user code in the app and the alarm will stop.
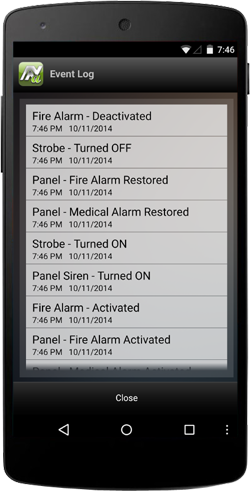
App Event Log
The Event Log in the app works when the background data feature is enabled in the app from the app options screen.
If background data is not enabled then you will not get any events from your panel while the app is not visible/open on the screen.
The Event log in the app will log events from the panel into the app database which means it doesn’t poll events from the panel.
If your Android device is disconnected from the panel then the events will not be logged in the app and you will not get events during that time.
Pressing the 3 dots up the top right you can select Event Log from the list and view the events that the app has captured while it has been connected to the panel.
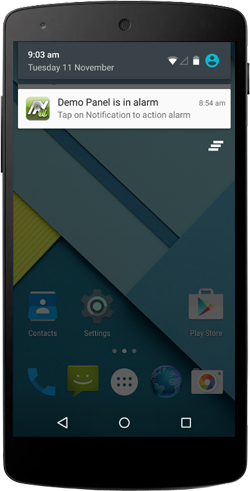
Notifications
If you have background data enabled in the app then you will be able to enable the notifications feature from the app options screen.
Tapping on the Notification will then automatically open the app and connect to the correct panel (if you have more then one panel enabled) and then will allow you to then action the alarm.
This Notification will also sound and display while the app is open.
Notifications will only happen if your device is connected to a Wi-Fi or Data mobile network. If you loose mobile data coverage or have a weak mobile coverage then you will not get any Notifications in the app. It’s the users responsibly to ensure they have a data signal on there device.
Please note this feature may be removed at any time without notice. Please use this feature at your own risk, as we can’t be reliable if your device looses connection to your panel when it goes into alarm.
As of version 2.2.0 of the Ness aComms app it will display a ‘N’ icon in the system notification tray when background data is enabled. This will help keep the connection alive while the app is running in the background. More info about this icon here: https://www.droidsoft.net/acomms-background-icon/